Chem Lab Manual 2018
by D. J. Bouwsma
Table of contents hold down CTRL and click.
1 Measurement and Math
2 Glassware Fabrication
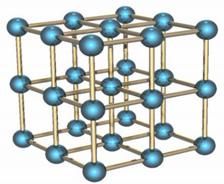
3 Molecular Models 1
4 The Borax Bead Test to Discriminate Metal Ions
5 Spectroscopy - Flame Test Lab
6 Hydrates
7 Molar Solution of a Solid Chemical
10 Ionic Salts 1: Separation of Dissolved Liquids
11 Ionic Salts 2: Growing Crystals Using Supersaturation
12 Ionic Salts 3: Electroplating With A Metal Ion Salt
14 Titration of Hydrochloric Acid with Sodium Hydroxide
16 Build a Blimp Using Gas Laws
17 Make a Ferromagnetic Liquid
Chemistry Lab
Lab 1 Measurement and Math
Linear Measurement by Geometric Principles
Introduction:
 Science is based on
empiricism, that is, it is based on what is measureable Often direct
measurement is not possible. Mathematical computation must take the place of
direct measurement. In this lab, you will measure objects using the geometric
principle of similar triangles.
Science is based on
empiricism, that is, it is based on what is measureable Often direct
measurement is not possible. Mathematical computation must take the place of
direct measurement. In this lab, you will measure objects using the geometric
principle of similar triangles.
The Principle:
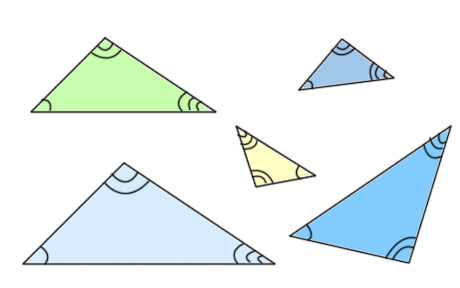
Two triangles are similar if the only difference in them is size. You may have to flip them or turn them, however to see that they are the same. Here are some examples of similar triangles:
For similar triangles, corresponding sides always have the same ratio. You can use this fact to figure out distances and heights. Here are some examples:
Since the triangles have the
same shape, if you know how far the man is from the mirror (say 6 feet) and
you know how far the the mirror is from the stop light (say 24 feet) then
you know the light is 24/6 or 4 times higher than the height of the man.
It is a simple ratio.

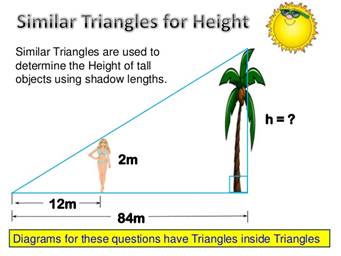
Here is another example:
In this case the tree is 84/12, or 7 times closer to the end of the shadow than the woman is, so the tree is 7 times higher than she is.
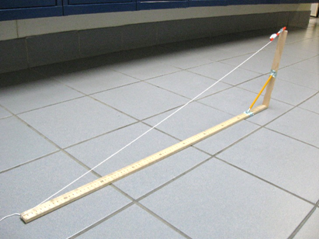
Materials:
· Meter stick
· Ruler or other substitute
· Pencil
· String
·
 Tape
Tape
· Straw

Suggestions:
1. Take extra care that the pencil keeps the sticks at a right angle to each other.
2. You want to be really careful that you take measurements from level surfaces.
3. It would be possible to measure widths of distant objects by placing your device flat against a wall.
4. Improve the device. (Each unique and beneficial modification is worth 1/3 of a letter grade extra credit.)
Report:
NOTE: Each object you measure must not have been measured by other students.
|
Assignment |
Description |
Distance to object |
Meter stick reading |
Estimated size |
|
Something in the room |
|
|
|
|
|
Something on the second floor |
|
|
|
|
|
Something far away |
|
|
|
|
|
Something very small |
|
|
|
|
|
Your Choice |
|
|
|
|
|
Your Choice |
|
|
|
|
|
Your Choice |
|
|
|
|
Questions:
1. What is the accuracy of your device?
2. How could you improve this device?
3. Using this principle, how could you measure the distance the moon is from the earth?
Chemistry Lab
2 Glassware Fabrication
Materials:
· Glass rods
· Bunsen burner
· Sparker
· Eye protection
· Protective paper towels
Directions:Read any handouts about glassware fabrication and watch the videos, then manipulate the glass tubing to produce the objects listed in the table below and have them initialed when you finish for credit.
|
Sign off |
Task |
|
|
Cut glass tubing using a triangular file |
|
|
Fire polish |
|
|
90® Bend |
|
|
Insert glass tube in stopper |
|
|
Remove glass tubing from stopper |
|
|
Glass U shape |
|
|
Draw a pipette |
|
|
Glass T |
Chemistry Lab
3 Molecular Models 1
Using your phone and your text book, look up the chemical model or “configuration” for each of the following chemicals and build it using one of the modeling kits. Build each molecule with a different partner.
|
|
Formula |
Name |
Chem Name |
Pts |
Partner Name |
Signature |
|
1 |
H2O |
Water |
Dihydrogen Oxide |
1 |
|
|
|
2 |
CH4 |
Methane gas |
Carbon Tetrahydride |
1 |
|
|
|
3 |
CH3COOH |
Vinegar |
Acetic Acid |
6 |
|
|
|
4 |
O2 |
Oxygen gas |
Dioxygen |
1 |
|
|
|
5 |
NaCl |
Salt |
Sodium Chloride |
1 |
|
|
|
6 |
CH3CHOHCH3 |
Rubbing Alcohol |
Isopropyl Alcohol |
6 |
|
|
|
7 |
NaClO |
Bleach |
Sodium Hypochlorite |
3 |
|
|
4 The Borax Bead Test to Discriminate Metal IonsFrom http://www.brainyresort.com/en/borax-bead-test/ The borax bead test is based on the creation of a glassy bead that can variously change color when put under a Bunsen flame, potentially revealing a whole series of compounds, depending on their chemical (electronic) features. First of all a loop, eyelet, is made in the end of a Nichrome wire. Then it's loaded with borax or phosphorus salt and heating in the flame you get a clear, colorless glassy sphear, the so called "bead". The bead will be our reagent to identify specific cationic components (borax bead test) or cationic and anionic components (phosphorus salt bead test). In the present article we're going to see how to carry out identification tests with this interesting method. Bead Preparation When we talk about "borax" we're referring to the compound with formula Na2B4O7 · 10H2O, IUPAC name sodium tetraborate decahydrate but also known as sodium tetraborate.As support to create the bead is commonly used a platinum wire that is firmly attached to the end of a glass stick.Before creating the pearl, it would be good practice to clean the wire moistening it with6N HCl, to solubilize impurities such as any residual crust of previous uses. The hydrochloric acid is necessary to transform the various compounds eventually present in chlorides, usually volatile and thus eliminated in the flame.Residue of other substances could indeed alter the outcome of the test.Alternatively, you can clean the wire with borax itself, loading the loop with borax and heating in flame.The impurities will be adsorbed within the melted bead, which is then eliminated. Now, we're going to consider from a chemical (and physical) viewpoint what happens when the bead is heated in flame. The first thing we notice is the so-called "popcorn" effect, namely the swelling of the substance caused by the loss of crystallization water: Na2B4O7
· 10H2O For further warming, tetraborate decomposes to give sodium metaborate and boric oxide. Na2B4O7 This is our pearl before the reaction with the unknown substance.It should appear clear and colorless.If it wasn't we must continue heating up to fusion and reloading with more borax.Alternatively, as mentioned earlier, we unload the bead onto the work surface, and we create a new one. Recognition of the cationic component: bead test We bring in our flame (Bunsen-Burner) the glass-like bead. We heat it up to incandescence and then we remove it from the flame. Then we let it cool slightly and then, with the bead (that's on the top of the wire, retained by the loop), we touch a small amount of unknown substance. The real reagent of this type of assay is boric oxide,B2O3 .This reacts with the oxides of certain metals to give the corresponding metaborates.These impart to the bead particular color features that may be indicative about the cationic composition of our unknown substance. In addition, the test may have different outcomes depending on which zone of the flame we select.In fact, in oxidizing flame we assist both to the formation of oxidized compounds (and then eventually with different colors) and tothermochromisms a physical phenomenon consisting in color change given by heating, whereas in the reducing flame we assist to the formation of reduced compounds (and then again eventually with different colors). Let's see what are the reactions involved step by step:
CuCO3 or CuNO3 or Cu(OH)2 etc-etc.
Oxidizing flame: CuO + B2O3→Cu(BO2)2 cupric metaborate green (hot), blue-green (cold) Reducing flame (the
reducing agent is elemental carbon powder):
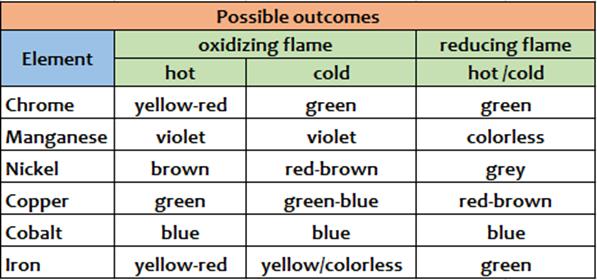
4NaBO2 + 2Cu(BO2)2 + C According to the different color we can recognize different cations, and that's is the aim of this old but interesting assay. Expedients When you are loading the borax bead with the unknown substance it is good to do so it is adsorbed by the bead just a minimal amount of unknown substance.An excess of the reagent may not react and therefore remain as an unreacted dark mass that does not allow to observe well the coloration assumed by the small bead. Conclusions This test is a dry assay.It allows to recognize the following substances: Cr, Mn, Ni, Co, Cu, Fe.The real test reagent is boric oxide (B2O3) which reacts with the oxides of these metals to give colored metaborates.It may be useful to bring the pearl both in oxidizing flame, to observe highest oxidation states coloration of metals and eventual thermochromisms, and in reducing flame, where the metaborates of the metals react with carbon powder (C) and are reduced to lower oxidation states if not, in some cases, the same metal in the elemental state (as copper in the example above). Scheme of possible outcomes (1 or 2)
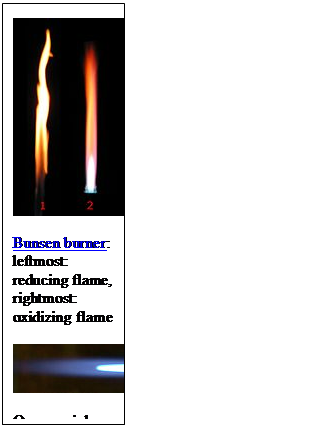
From Wikipedia, the free encyclopedia In various burners, the oxidizing flameis the flameproduced with an excessive amount of oxygen. When the amount of oxygen increases, the flame shortens, its color darkens, and it hisses and roars.[1] With some exceptions (e.g., platinum soldering in jewelry), the oxidizing flame is usually undesirable forweldingand soldering, since, as its name suggests, it oxidizesthe metal's surface.[1]The same principle is important in firing pottery — seeReducing atmosphere. The reducing flameis the flame with low oxygen. It has a yellow or yellowish color due to carbonor hydrocarbons[2]which bind with (or reduce) the oxygen contained in the materials processed with the flame.[1] The reducing flame is also called the carburizing flame, since it tends to introduce carbon into the molten metal. The neutral flameis the flame in which the amount of oxygen is precisely enough for burning, and neither oxidation nor reduction occurs.[1]A flame with a good balance of oxygen is clear blue. The reducing and neutral flames are useful in soldering and annealing.[1]
Table of Reactions Obtained with BoraxFrom http://webmineral.com/help/BoraxBead.shtml#.Waf5bHQpCvM This table of flux fusion reactions with borax is based largely on the book "Determinative Mineralogy and Blowpipe Analysis" by Brush & Penfield, 1906. The reactions are observed by fusing a crushed (and roasted in the case of sulfides) sample of the mineral in a borax lead embedded on a loop of platinum wire. The color is observed in the bead after heating the sample with the oxidizing flame and then the reducing flame of the torch (blowpipe).
|
||||||||||||||||||||||||||||||||||||||||||||||||||||||||||||||||||||||||||||||||||||||||||||||||||||||||||||||||||||||||||||||||||||||||

Assignment:
Use the Borax Bead Test to determine the metal ions in the following unknowns:
|
|
Oxidizing Flame Color |
Reducing Flame Color |
Metal Ion in Sample |
||
|
|
Hot |
Cold |
Hot |
Cold |
|
|
1 |
|
|
|
|
|
|
2 |
|
|
|
|
|
|
3 |
|
|
|
|
|
|
4 |
|
|
|
|
|
|
5 |
|
|
|
|
|
Chemistry Lab
5 Spectroscopy - Flame Test Lab
Background:
The normal electron configuration of atoms or ions of an element is known as the “ground state.” In this most stable energy state, all electrons are in the lowest energy levels available. When atoms or ions in the “ground state” are heated to high temperatures, some electrons may absorb enough energy to allow them to “jump” to higher energy levels. The element is then said to be in the “excited state.” This excited configuration is unstable, and the electrons “fall” back to their normal positions of lower energy (ground state). As the electrons return to their normal levels, the energy that was absorbed is emitted in the form of electromagnetic energy. Some of this energy may be in the form of visible light. The color of this light can be used as a means of identifying the elements involved. Such analysis is known as a flame test.
To do a flame test on a metallic element, the metal is first dissolved in a solution and the solution is then held in the hot, blue flame of a Bunsen burner. This test works well for metal ions, and was perfected by Robert Bunsen (1811 – 1899). Many metallic ions exhibit characteristic colors when vaporized in the burner flame.
Quick Test:
|
|
Name for the most stable state for electrons |
|
|
Name one thing that can energize electrons |
|
|
What is an element in a high energy level called? |
|
|
How do chemicals make light? |
|
|
What is light? |
Purpose:
The purpose is to observe the characteristic colors produced by certain metallic ions when vaporized in a flame and then to identify an unknown metallic ion by means of its flame test.
Materials:
Set of metal chloride salts (NaCl, CuCl2, KCl, CaCl2, SrCl2, LiCl, CoCl2, BaCl2)
Bunsen Burner
Nichrome wire
Unknown solution (for each student)
Safety: Be sure to wear goggles and an apron at all times
Procedure:
- Light the Bunsen burner and adjust it so that it has a hot blue flame.
- Using a clean nichrome wire loop, wet the loop and dip it into one of the salts then hold it in the hottest part of the burner flame. Observe the color of the flame. Carefully record your observations in the data table. Be accurate here - your description of the color must be accurate enough to distinguish this metal ion from the other ions tested.
- Clean the nichrome loop for each of the other salts, and check the color of their flame tests. Record your observations for each.
4. When you have tested all the known solutions and can distinguish the color of each metal ion, obtain unknown solutions and determine which metal ions are present by performing a flame test and comparing this data to your previous data.
Data table:
|
Metal ion |
Color of Flame |
|
barium |
|
|
calcium |
|
|
cobalt |
|
|
copper |
|
|
lithium |
|
|
potassium |
|
|
sodium |
|
|
strontium |
|
|
|
|
|
Unknown # ____ |
|
|
Unknown # ____ |
|
Based on your observations, identify the two unknowns you examined:
Unknown # _____ is ________________________________
Unknown # _____ is ________________________________
Questions:
1. State at least three problems that may be involved when using flame tests for identification purposes.
2. Which ions produce similar colors in the flame tests?
3. What purpose did the cobalt glass serve?
4. Explain how the colors observed in the flame tests are produced.
5. How could this test be made more accurate?
6. What would happen if a chemical makes more than one color because its electrons jump to two or more levels?
Chemistry Lab
6 Hydrates
 LABORATORY 6.6: DETERMINE THE FORMULA OF A HYDRATE[1]
Many ionic compounds exist in two or more forms. The anhydrous form of the compound contains only molecules of the compound itself. The hydrated form or forms of the compound contains molecules of the compound and one or more molecules of water loosely bound to each molecule of the compound. These water molecules are referred to as water of hydration or water of crystallization, and are incorporated into the crystalline lattice as the compound crystallizes from an aqueous solution.
Because these water molecules assume defined positions within the crystalline lattice, the proportion of water molecules to compound molecules is fixed and specific. For example, copper sulfate exists as an anhydrous compound (CuSO4) and in hydrated form as the pentahydrate (CuSO4 5H20). Copper sulfate does not exist in the tetrahydrate (CuSO4 4H20) or hexahydrate (CuSO4 • 6H20) forms, because the physical geometry of the crystalline lattice does not permit four or six water molecules to associate with one copper sulfate molecule. The number of molecules of water in a hydrate is usually an integer, but not always. For example, some hydrates exist in the form X2. 5H20, where each molecule of the compound X is associated with a fractional number (in this, case 2.5) molecules of water.
Some compounds, including copper sulfate, have only one stable hydrated form. (Monohydrate and trihydrate forms of copper sulfate are known. but are difficult to prepare and tend to spontaneously convert to the more stable anhydrous or pentahydrate forms by absorbing or giving up water molecules.) Other compounds have two or more common hydrated forms. For example, sodium carbonate exists in anhydrous form (Na2CO3), monohydrate form (Na2CO3 • 1H20), heptahydrate form (Na2CO3 • 7H20), and decahydrate form (Na2CO3 • 10H20). Many anhydrous compounds are hygroscopic, which means they absorb water vapor from the air and are gradually converted to a hydrated form. Such compounds, such as calcium chloride (CaCl2), are often used as drying agents. (Some of these compounds absorb so much water vapor from the air that they actually dissolve In the absorbed water, a property called
REQUIRED EQUIPMENT AND SUPPLIES
1. goggles, gloves, and protective clothing
2. balance and weighing papers
3. crucible with cover and tongs
4. gas burner
5. ring stand, ring, and clay triangle
6. copper sulfate pentahydrate (-5 g)
deliquescence ,) Conversely. the water molecules in some grated compounds are so loosely bound that the compound spontaneously loses some or all of its water of hydration if left ina dry environment, a property called efflorescence. some compounds may be either hygroscopic or efflorescent. depending on the temperature and humidity of the environment. For example. anhydrous copper sulfate exposed to a humid atmosphere gradually absorbs water vapor and is converted to the pentahydrate form, and copper sulfate pentahydrate exposed to warm. dry air gradually loses water and is converted to the anhydrous form. Because the water of crystallization in a hydrate can be driven off by heating the hydrate, a hydrate is actually a mixture of an anhydrous salt with water rather than a separate compound. (Recall that a mixture is a substance that can be separated into its component parts by physical means. such as heating, as opposed to a substance that can be separated into its component parts only by using chemical means.) Because the number of water molecules in a hydrate are in fixed proportion to the number of molecules of the compound, it's possible to determine that fixed proportion by weighing a sample of a hydrate, heating the compound to drive off the water of crystallization, weighing the resulting anhydrous compound, and using the mass difference between the hydrated and anhydrous forms to calculate the relationship.
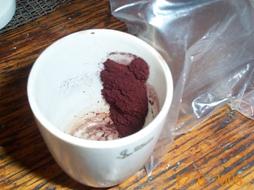
In this laboratory, we'll heat hydrated copper sulfate to drive off the water of crystallization and use the mass differential to determine how many molecules of water are associated with each molecule of hydrated copper sulfate. We could have used any number of common hydrates, but we chose copper sulfate because the hydrated and anhydrous forms have distinctly different appearances. In hydrated form, copper sulfate forms brilliant blue crystals; in anhydrous form, copper sulfate is a white powder (see Figure 6-7).
CAUTIONS This laboratory uses strong heat. Use extreme care with the heat source and hot objects. A hot crucible looks exactly like a cold crucible. Wear splash goggles, gloves, and protective clothing.
PROCEDURE.
1.If you have not already done so, put on your splash goggles. gloves. and protective clothing.
2.Set up your ring stand. support ring, clay triangle. and burner. Heat the crucible and cover gently for a minute or two to vaporize any moisture.
3.Remove the heat and allow the crucible and cover to cool to room temperature, which may require 10 or 15 minutes.
4.Weigh the crucible and cover. and record their mass to 0.01 g on line A of Table 6-7.
5.Transfer about 5.0 g of copper sulfate pentahydrate to the crucible. (The copper sulfate pentahydrate should be in the form of fine crystals. If it is in the form of large lumps, use your mortar and pestle to crush It into finer crystals.)
6.Reweigh the crucible, cover, and contents and record the mass to 0.01 g on line B of Table 6-7.
7. Subtract the mass of the empty crucible and lid from the mass of the crucible with the copper sulfate and record the initial mass of the copper sulfate pentahydrate on line C of Table 6-7.
8. Place the crucible and cover on the heat source and begin heating them gently. As the crucible warms up, increase the heat gradually until it is at its highest setting. Continue heating the crucible for at least 15 minutes.
9. Remove the heat and allow the crucible. cover, and contents to cool to room temperature, which may require 10 or 15 minutes.
10.After you are sure the crucible has cooled. reweigh crucible, lid, and contents. Record the mass to 0.01 g on line D of Table 6-7.
11. Subtract the initial mass of the crucible and lid (line A) from this value, and record the mass of the anhydrous copper sulfate to 0.01 g on line E of Table 6-7.
 12. Subtract the
mass of the anhydrous copper sulfate (line E) from the mass of the copper
sulfate pentahydrate (line C). and record the mass loss to 0.01 g on line F of
Table 6-7.
12. Subtract the
mass of the anhydrous copper sulfate (line E) from the mass of the copper
sulfate pentahydrate (line C). and record the mass loss to 0.01 g on line F of
Table 6-7.
|
|
Table 6-7 |
Result |
|
A |
Mass Crucible |
|
|
B |
Mass: Crucible + sample |
|
|
C |
Mass of sample CuSO4 |
|
|
D |
Mass after heating |
|
|
E |
Mass of anhydrous salt |
|
|
F |
Mass loss |
|
|
G |
Molar mass CuSO4 |
|
|
H |
No. Moles of CuSO4 |
|
|
I |
Molar mass H2O |
|
|
J |
No. Moles of H2O |
|
|
K |
Ratio CuSO4 to H2O |
|
 7 Molar Solution of a Solid Chemical
In this lab, we make up 100 mL of a stock solution of copper (II) sulfate, which is used in many of the other lab. Although we won't standardize[2] the solution, we will make every effort to achieve an accurate concentration by weighing masses carefully and measuring volumes carefully.
1. Calculate the molar weight of copper sulfate pentahydrate.
|
1 |
|
= Molecular weight of Cu, copper |
6 |
|
= Molecular weight of H, hydrogen |
||
|
2 |
|
= Molecular weight of S, sulfur |
7 |
|
= Molecular weight of O, oxygen |
||
|
3 |
|
= Molecular weight of O, oxygen |
8 |
|
= Molecular weight of H2 |
||
|
4 |
|
= Molecular weight O4 – four oxygen |
9 |
|
= Molecular weight of H2O |
||
|
5 |
|
= Molecular weight of CuSO4 |
10 |
|
= Molecular weight of 5 H2O |
||
|
|
|
||||||
|
11 |
|
= Molecular weight of CuSO4 × 5H2O |
|||||
|
12 |
g/mol |
= Molar weight of CuSO4 × 5H2O |
|||||
2. Looking up copper sulfate in a reference book, we find: its solubility at 20°C is 317 g/L.
3. Dividing 317 g/L by your answer in box 12will tell you how many moles are in a saturated solution. This will protect us against the possibility that the solution will crystalize if the temperature drops.
|
13 |
|
= Moles in a saturated solution of CuSO4 |
4. Calculate the number of grams you need to weigh out to make 100 ml of 0.1 molar CuSO4. (Hint, because 0.1 molar solutions are one tenth as strong, you need much less CuSO4. Again, because molarity is are measured as grams per liter, you are going to need much less again.)
|
14 |
|
= Grams of CuSO4× 5H2Oneeded to make up 100 ml of 0.1 molar CuSO4. |
5. Measure out 100 ml of H2O.
6. Tare a scale.
|
15 |
|
= Mass of container and H2O |
|
16 |
|
= Mass of container + H2O + CuSO4× 5H2O (from box 14) |
7. Add the water to a container and weigh them, then carefully add the copper sulfate.
8.Transfer the 0.1M copper sulfate solution to a bottle and label it for use in later labs.
Chemistry Lab
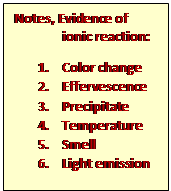
Using the Ionic Interaction Kittest for ionic reactions and post the results in the table below. Do this lab as a whole class.
1. Place 3 drops of the cation acetate in the top two rows.
2. Add 3 drops of each anion starting with Pb in sequence so all cations are tested against acetate.
3. Record the results below for each anion and cation.
4. Go to step 1 and repeat it for bromide and all the rest of the anions.
|
|
|
Cations |
||||||||||||||
|
|
|
Pb2+ |
Ag+ |
Hg2+ |
Cu2+ |
Cd2+ |
Ni2+ |
Co2+ |
Mn2+ |
Zn2+ |
Al3+ |
Cr3+ |
Fe3+ |
Ba2+ |
Sr2+ |
Ca2+ |
|
Aions |
Acetate |
|
|
|
|
|
|
|
|
|
|
|
|
|
|
|
|
Bromide |
|
|
|
|
|
|
|
|
|
|
|
|
|
|
|
|
|
Carbonate |
|
|
|
|
|
|
|
|
|
|
|
|
|
|
|
|
|
Chloride |
|
|
|
|
|
|
|
|
|
|
|
|
|
|
|
|
|
Chromate |
|
|
|
|
|
|
|
|
|
|
|
|
|
|
|
|
|
Hexacyano Ferrate(II) |
|
|
|
|
|
|
|
|
|
|
|
|
|
|
|
|
|
Hexacyano Ferrate(III) |
|
|
|
|
|
|
|
|
|
|
|
|
|
|
|
|
|
Hydroxide |
|
|
|
|
|
|
|
|
|
|
|
|
|
|
|
|
|
Iodide |
|
|
|
|
|
|
|
|
|
|
|
|
|
|
|
|
|
Oxalate |
|
|
|
|
|
|
|
|
|
|
|
|
|
|
|
|
|
Phosphate |
|
|
|
|
|
|
|
|
|
|
|
|
|
|
|
|
|
Silicate |
|
|
|
|
|
|
|
|
|
|
|
|
|
|
|
|
|
Sulfate |
|
|
|
|
|
|
|
|
|
|
|
|
|
|
|
|
Ionic Interaction Lab
 Acetate C2H302-
COOH-
Acetate C2H302-
COOH-
Bromide Br-
![]()
 Carbonate -
Hexacyanoferrate (II) C6FeN64-Ferricyanide

Hexaxanoferrate (III) C6FeN63- Ferrocyanide
Hydroxide OH-
 Iodide I-
Oxilate C2O4, (COO)2

Phosphate PO43-
Silicate SiO34-

Sulfate SO42-
Pb2+
Ag+
Hg2+
Cu2+
Cd2+
Ni2+
Co2+
Mn2+
Zn2+
Al3+
Cr3+
Fe3+
Ba2+
Sr2+
Ca2+
 Chemistry Lab
9 Molecular Modeling-2
Using the Deluxe Molecular Modeling Kit and VSEPR(“vesper”) build 3-D models of each of the chemicals listed in the table.
1. Fill out the table.
2. Build a model.
3. Have the instructor check it off.
|
|
Formula |
Name |
Elect rons |
Skeleton |
Lewis Dot Drawing |
Configuration[3] |
|
1 |
NH3 |
Ammonia |
|
|
|
|
|
2 |
CO2 |
Carbon Dioxide |
|
|
|
|
|
3 |
H2O |
Water |
|
|
|
|
|
4 |
CH4 |
Methane |
|
|
|
|
|
5 |
PCl5 |
Phosphorus Pentachloride |
|
|
|
|
|
6 |
C2H6O |
Ethanol |
|
|
|
|
|
7 |
C8H18 |
Octane |
|
|
|
|
|
8 |
Yours |
|
|
|
|
|
A Brief Tutorial on Drawing Lewis Dot Structures[4]
We will use three molecules (CO2, CO32-
and NH4+) as our examples on this guided tour of a simple
method for drawing Lewis dot structures. While this algorithm may not work in
all cases, it should be adequate the vast majority of the time.
Procedure for Neutral Molecules (CO2)
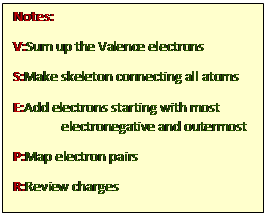
1. Decide how many valence (outer shell)electrons are possessed by each atom in the molecule.
2. If there is more than one atom type in the molecule, put the most metallic or least electronegative atom in the center. Recall that electronegativity decreases as atom moves further away from fluorine on the periodic chart.
Arrangement of atoms in CO2:![]()
3. Arrange the electrons so that each atom contributes one electron to a single bondbetween each atom.
![]()
4. Count the electrons around each atom: are the octets complete? If so, your Lewis dot structure is complete.
5. If the octets are incomplete, and more electrons remain to be shared, move one electron per bond per atom to make another bond. Note that in some structures there will be open octets (example: the B of BF3), or atoms which have ten electrons (example: P in PF5) or twelve electrons (example: S in SF6).

6. Repeat steps 4 and 5 as needed until all octets are full.
7. Redrawthe dots so that electrons on any given atom are in pairs wherever possible.
![]()
Procedure for Negatively Charged Ions (CO32-)
Use the same procedure as outlined above, then as a last step add one electron per negative charge to fill octets. Carbonate ion has a 2- charge, so we have two electrons available to fill octets.
Using the procedure above, we arrive at this structure: 
The two singly-bonded oxygen atoms each have an open octet, so we add one electron to each so as to fill these octets. The added electrons are shown with arrows. Don't forget to assign formal charges as well! The final Lewis structure for carbonate ion is:

Procedure for Positively Charged Ions (NH4+)
Use the same procedure as outlined above, then remove one electron per positive charge as needed to avoid expanded octets. When using this procedure for positively charged ions, it may be necessary to have some atoms with expanded octets (nitrogen in this example). For each unit of positive charge on the ion remove on electron from these expanded octets. If done correctly, your final structure should have no first or second period elements with expanded octets.
Using the basic procedure outlined above, we arrive at a structure in which nitrogen has nine valence electrons. (Electrons supplied by hydrogen are red; electrons supplied by nitrogen are black.) Removal of one of these valence electrons to account for the 1+ charge of ammonium ion solves this octet rule violation.

Molecular Configurations (Shapes)[5]
The steric number is the number of atoms bonded to the central atom plus the number of non-bonding pairs, and thus the steric number for water is 4. With this information available, together with the table below, you can predict the 3-dimensional shape of the molecule.
Chemistry Lab
10 Ionic Salts 1: Separation of Dissolved Liquids
|
Why Do Some Solids Dissolve in Water? The sugar we use to sweeten coffee or tea is a molecular solid, in which the individual molecules are held together by relatively weak intermolecular forces. When sugar dissolves in water, the weak bonds between the individual sucrose molecules are broken, and theC12H22O11 molecules are released into solution.
We can generally assume that salts dissociate into their ions when they dissolve in water. Ionic compounds dissolve in water if the energy given off when the ions interact with water molecules compensates for the energy needed to break the ionic bonds in the solid and the energy required to separate the water molecules so that the ions can be inserted into solution. Discussions of solubility equilibria are based on the following assumption: When solids dissolve in water, they dissociate to give the elementary particles from which they are formed. Thus, molecular solids dissociate to give individual molecules
When the salt is first added, it dissolves and dissociates rapidly. The conductivity of the solution therefore increases rapidly at first.
The concentrations of these ions soon become large enough that the reverse reaction starts to compete with the forward reaction, which leads to a decrease in the rate at which Na+ and Cl-ions enter the solution.
Eventually, the Na+ and Cl- ion concentrations become large enough that the rate at which precipitation occurs exactly balances the rate at which NaCl dissolves. Once that happens, there is no change in the concentration of these ions with time and the reaction is at equilibrium. When this system reaches equilibrium, it is called a saturated solution, because it contains the maximum concentration of ions that can exist in equilibrium with the solid salt. The amount of salt that must be added to a given volume of solvent to form a saturated solution is called the solubility of the salt. There are a number of patterns in the data obtained from measuring the solubility of different salts. These patterns form the basis for the rules outlined in the table below, which can guide predictions of whether a given salt will dissolve in water. These rules are based on the following definitions of the terms soluble, insoluble, and slightly soluble.
Solubility Rules for Ionic Compounds in Water
|
||||||||||||||||||||||||||||||||||||||||||||||||||||||||||||||||||||
|
Solubility: How solubility is measured The amount of solute that can be dissolved in a solvent is used as the measure of solubility. The conventional reference for solubility is the number of grams of solute that can dissolve in 100 mL of solvent. Sometimes the solubility is in grams of solute per 100 grams of solvent. The table below gives typical solubility data for some common inorganic compounds. |
|
Solubility of Common inorganic compounds in grams solute per 100 mL of water |
|
Substance |
0oC |
10oC |
20oC |
30oC |
40oC |
50oC |
|
KI, potassium iodide |
127.5 |
136 |
144 |
152 |
160 |
168 |
|
KCl, potassium chloride |
27.6 |
31.0 |
34.0 |
37.0 |
40.0 |
42.6 |
|
NaCl, sodium chloride |
35.7 |
35.8 |
36.0 |
36.3 |
36.6 |
37.0 |
|
NaHCO3 , sodium bicarbonate |
6.9 |
8.15 |
9.6 |
11.1 |
12.7 |
14.45 |
|
NaOH, sodium hydroxide |
----------- |
------------- |
109 |
119 |
145 |
174 |
|
MgSO4• 7 H2O, epsom salts magnesium sulfate heptahydrate |
------------ |
23.6 |
26.2 |
29 |
31.3 |
------------- |
 These
values are the amount of solute that will dissolve and form a saturated
solution at the temperature listed. A saturated solution is one where there is
an equilibrium between undissolved solute and dissolved solute.
These
values are the amount of solute that will dissolve and form a saturated
solution at the temperature listed. A saturated solution is one where there is
an equilibrium between undissolved solute and dissolved solute.
NaCl(s) <---> Na1+(aq) + Cl1-(aq)
The solvent cannot dissolve more solute at that temperature.The solubility can be increased if the temperature is increased. The table shows that solubility usually increases with increasing temperature. Clearly there are exceptions such as Ce2(SO4)3
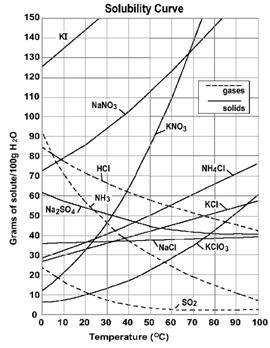
Reading the Solubility Plot
A saturatedKCl solution at 10oC will have 31 grams of KCldissolved in 100 grams of water. If there are 40 grams ofKCl are in the container, then there will be 9 grams of undissolvedKClremaining in the solid.
Raising the temperature of the mixture to 30oC will increase the amount of dissolvedKCl to 37 grams and there will be only 3 grams of solid undissolved. The entire 40 grams can be dissolved if the temperature is raised above 40oC.
Cooling the hot 40oC solution will reverse the process. When the temperature decreased to 20oC the solubility will eventually be decreased to 34 gramKCl. There is a time delay before the extra 6 grams of dissolvedKClcrystallizes. This solution is "supersaturated" -- a temporary condition. The "extra" solute will come out of solution when the randomly moving solute particles can form the crystal pattern of the solid. A "seed" crystal is sometimes needed to provide the surface for solute particles to crystallize on and establish equilibrium.
Separation of Dissolved Liquids
Goal:
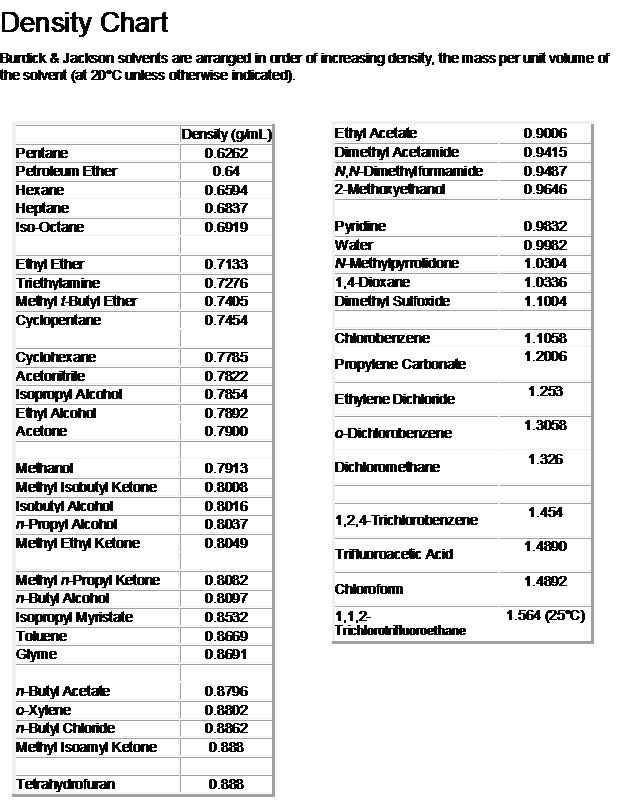
Purify 70% alcohol by mixing it with salt. Then measure the purity of your solution by calculating its density.
Theory:
Alcohol is usually purified by distillation. Distillation is the process of separating components by careful temperature controlled boiling and condensation. In theory, because alcohol boils at a lower temperature than water, heating a mixture will boil the alcohol off and leave only the water. But, alcohol isazeotropic at 4%. An azeotrope is a mixture of two or more liquids whose proportions cannot be altered or changed by simple distillation. This happens because when an azeotrope is boiled, the vapor has the same proportions as the unboiled mixture.That means that a 4% to 96% alcohol-water mixture actually boils at a lower temperature than pure alcohol. We are going to see if we can produce a purer alcohol solution using ionized salts. First we will mix a measured amount of NaCl (noniodized salt) into the isopropyl alcohol. The salt will dissolve in the water. Because salt water is heavier than alcohol, it will be drawn out of the alcohol mixture and form a layer at the bottom of the container.
Procedure:
|
1. Measure out about 50 mL of isopropyl alcohol and record its exact volume → |
|
|
2. Find out how many grams of salt it takes to make a saturated solution at 20⁰, using the internet, or the graph above. → |
|
|
3. Calculate how much salt you need by solving this equation →
|
|
|
4. Combine the alcohol and the salt you measured in steps 1-3. 5. Stir the mixture until the salt is completely dissolved. 6. Wait for the liquids to separate in a sealed container. |
|
|
7. Weigh a graduated cylinder. → |
|
|
8. Carefully pour off some of the purified alcohol from the top layer into the graduated cylinder recording thevolume of the alcohol → |
|
|
9. Reweigh the graduated cylinder.→ |
|
|
10. Calculate the weight of the alcohol (subtract) → |
|
|
11. Calculate the density
of the alcohol |
|
|
12. Look up the density of isopropyl alcohol in the table at the end of this packet → |
|
|
13. The density of water is |
1.000 g/mL |
|
14. Calculate the purity of your product using this formula:
(Final density =density times percent alcohol + density times percent water)So …
[box 11] [box 13] [box 12] Solve this for %alc |
|
Do your math computations here:
2 Growing Crystals Using Supersaturation
 Every
solid that can be dissolved in water has a solubility,
which is the largest quantity of the solid that can be dissolved in the water
to make a clear solution. When the water starts getting
cloudy and you can see solid particles floating around, that means no more
solid can dissolve into the water and the solution (water and solid mixture) is
saturated. But, the solubility of most
solids increases as the mixture is heated, so more of the solid can be
dissolved in hot water than in cold water. We are going to use this
characteristic of solutions to make crystals in this lab.
Every
solid that can be dissolved in water has a solubility,
which is the largest quantity of the solid that can be dissolved in the water
to make a clear solution. When the water starts getting
cloudy and you can see solid particles floating around, that means no more
solid can dissolve into the water and the solution (water and solid mixture) is
saturated. But, the solubility of most
solids increases as the mixture is heated, so more of the solid can be
dissolved in hot water than in cold water. We are going to use this
characteristic of solutions to make crystals in this lab.
 When
the molecules of the crystal come together, impurities
(which are the unwanted products of the chemical reaction) do
not fit into the structure, much like the wrong piece of a puzzle does not fit.
So, if the crystal forms slowly enough, the impurities will be rejectedbecause
they do not fit correctly, and instead, they remain in the solution and float
away. But if a solution is cooled too quickly, there is not time to
reject the impurities and instead, they become trapped in the crystal structure
and the pattern is disturbed. Timing is important.
When
the molecules of the crystal come together, impurities
(which are the unwanted products of the chemical reaction) do
not fit into the structure, much like the wrong piece of a puzzle does not fit.
So, if the crystal forms slowly enough, the impurities will be rejectedbecause
they do not fit correctly, and instead, they remain in the solution and float
away. But if a solution is cooled too quickly, there is not time to
reject the impurities and instead, they become trapped in the crystal structure
and the pattern is disturbed. Timing is important.
Procedure:
1. You will need Choose a salt from the front table. Available chemicals including: NaCl (table salt), CuSO4∙5H2O (root killer), Na2B4O7∙10H2O (borax).
2. Measure an amount of water that will fill a beaker to the half way mark, and pour it in the beaker.
3. Heat the water to about 50°C using a thermometer to monitor its temperature.
4. Look-up your salt up in the solubility graph above.
5. Measure out the amount of salt you will need to make a saturated solution. To do this, take the number of grams the graph indicated for the temperature of your water and multiply it by the number of mL of water in your beaker, then divide it by 100 mL, the amount of water the graph used as a basis.
6. Add the salt slowly while your partner stirs it in.
7. Stir patiently, but if the salt does not dissolve completely, heat it to a slightly higher temperature, or add a few drops of water. It is vital that the solution be saturated.
8.  Using
a pencil and some thread, hang a seed crystal in the solution, or just drop a
crystal into your solution as a “seed”. The crystal will grow around the seed
crystal and enlarge it.
Using
a pencil and some thread, hang a seed crystal in the solution, or just drop a
crystal into your solution as a “seed”. The crystal will grow around the seed
crystal and enlarge it.
9. Let the solution cool and crystalize.
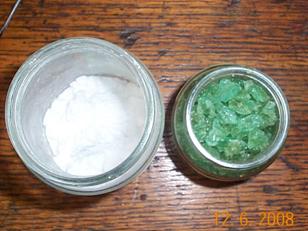
10. Remove your crystal and dry it for grading.
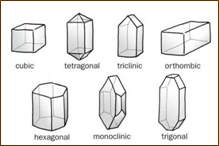
11. Categorize it using the picture to the right.
Chemistry Lab
11 Ionic Salts 2: Growing Crystals Using Supersaturation
|
Why Do Some Solids Dissolve in Water? The sugar we use to sweeten coffee or tea is a molecular solid, in which the individual molecules are held together by relatively weak intermolecular forces. When sugar dissolves in water, the weak bonds between the individual sucrose molecules are broken, and theC12H22O11 molecules are released into solution.
We can generally assume that salts dissociate into their ions when they dissolve in water. Ionic compounds dissolve in water if the energy given off when the ions interact with water molecules compensates for the energy needed to break the ionic bonds in the solid and the energy required to separate the water molecules so that the ions can be inserted into solution. Solubility Equilibria Discussions of solubility equilibria are based on the following assumption: When solids dissolve in water, they dissociate to give the elementary particles from which they are formed. Thus, molecular solids dissociate to give individual molecules
When the salt is first added, it dissolves and dissociates rapidly. The conductivity of the solution therefore increases rapidly at first.
The concentrations of these ions soon become large enough that the reverse reaction starts to compete with the forward reaction, which leads to a decrease in the rate at which Na+ and Cl-ions enter the solution.
Eventually, the Na+ and Cl- ion concentrations become large enough that the rate at which precipitation occurs exactly balances the rate at which NaCl dissolves. Once that happens, there is no change in the concentration of these ions with time and the reaction is at equilibrium. When this system reaches equilibrium, it is called a saturated solution, because it contains the maximum concentration of ions that can exist in equilibrium with the solid salt. The amount of salt that must be added to a given volume of solvent to form a saturated solution is called the solubility of the salt. Solubility Rules There are a number of patterns in the data obtained from measuring the solubility of different salts. These patterns form the basis for the rules outlined in the table below, which can guide predictions of whether a given salt will dissolve in water. These rules are based on the following definitions of the terms soluble, insoluble, and slightly soluble.
Solubility Rules for Ionic Compounds in Water
|
||||||||||||||||||||||||||||||||||||||||||||||||||||||||||||||||||||
|
Solubility: How solubility is measured The amount of solute that can be dissolved in a solvent is used as the measure of solubility. The conventional reference for solubility is the number of grams of solute that can dissolve in 100 mL of solvent. Sometimes the solubility is in grams of solute per 100 grams of solvent. The table below gives typical solubility data for some common inorganic compounds. |
|
Solubility of Common inorganic compounds in grams solute per 100 mL of water |
|
Substance |
0oC |
10oC |
20oC |
30oC |
40oC |
50oC |
|
KI, potassium iodide |
127.5 |
136 |
144 |
152 |
160 |
168 |
|
KCl, potassium chloride |
27.6 |
31.0 |
34.0 |
37.0 |
40.0 |
42.6 |
|
NaCl, sodium chloride |
35.7 |
35.8 |
36.0 |
36.3 |
36.6 |
37.0 |
|
NaHCO3 , sodium bicarbonate |
6.9 |
8.15 |
9.6 |
11.1 |
12.7 |
14.45 |
|
NaOH, sodium hydroxide |
----------- |
------------- |
109 |
119 |
145 |
174 |
|
MgSO4• 7 H2O, epsom salts magnesium sulfate heptahydrate |
------------ |
23.6 |
26.2 |
29 |
31.3 |
------------- |
These values are the amount of solute that will dissolve and form a saturated solution at the temperature listed. A saturated solution is one where there is an equilibrium between undissolved solute and dissolved solute.
NaCl(s) <---> Na1+(aq) + Cl1-(aq)
 The
solvent cannot dissolve more solute at that temperature.The
solubility can be increased if the temperature is increased.
The table shows that solubility usually increases with increasing temperature.
Clearly there are exceptions such as Ce2(SO4)3
The
solvent cannot dissolve more solute at that temperature.The
solubility can be increased if the temperature is increased.
The table shows that solubility usually increases with increasing temperature.
Clearly there are exceptions such as Ce2(SO4)3
Reading the Solubility Plot
A saturatedKCl solution at 10oC will have 31 grams of KCldissolved in 100 grams of water. If there are 40 grams ofKCl are in the container, then there will be 9 grams of undissolvedKClremaining in the solid.
Raising the temperature of the mixture to 30oC will increase the amount of dissolvedKCl to 37 grams and there will be only 3 grams of solid undissolved. The entire 40 grams can be dissolved if the temperature is raised above 40oC.
Cooling the hot 40oC
solution will reverse the process. When the temperature decreased to 20oC
the solubility will eventually be decreased to 34 gramKCl.
There is a time delay before the extra 6 grams of dissolvedKClcrystallizes.
This solution is "supersaturated" -- a temporary
condition. The "extra" solute will come out of solution when the
randomly moving solute particles can form the crystal pattern of the solid. A "seed"
crystal is sometimes needed to provide the surface for solute particles
to crystallize on and establish equilibrium.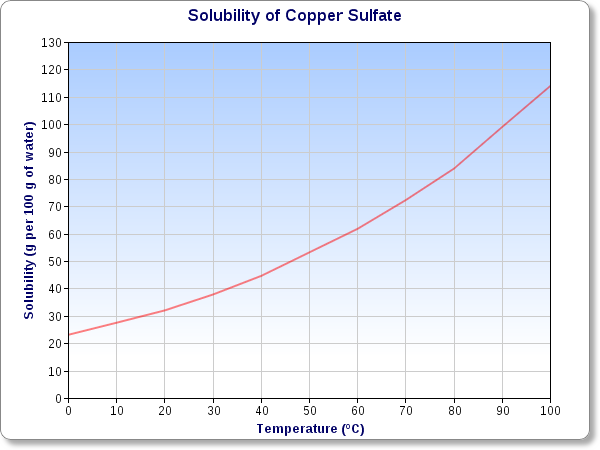
2 Growing Crystals Using Supersaturation
Every
solid that can be dissolved in water has a solubility,
which is the largest quantity of the solid that can be dissolved in water to
make a clear solution. When the water starts getting cloudy and you can see solid
particles floating around, that means no more solid can dissolve into the water
and the solution (water and solid mixture) is saturated.
But, the solubility of most solids increases as the mixture is heated, so more
of the solid can be dissolved in hot water than in cold water. We are going to
use this characteristic of solutions to make crystals in this lab.
When
the molecules of the crystal come together, impuritiesdo
not fit into the structure, much like the wrong piece of a puzzle does not fit.
So, if the crystal forms slowly enough, the impurities will be rejectedbecause
they do not fit correctly, and instead, they remain in the solution and float
away. But if a solution is cooled too quickly, there is not time to
reject the impurities and instead, they become trapped in the crystal structure
and the pattern is disturbed. Timing is important.
Procedure:
12. You will need to choose a salt from the front table. Available chemical include thing like: NaCl (table salt), CuSO4∙5H2O (root killer), Na2B4O7∙10H2O (borax).
13. Measure an amount of water that will fill a beaker to the half way mark, and pour it in the beaker. (Be sure to record the measurement.)
14. Heat the water to about 50°C using a thermometer to monitor its temperature.
15. Look-up your salt up in the solubility graph above.
16. Measure out the amount of salt you will need to make a saturated solution. To do this, take the number of grams the graph indicated for the temperature of your water and multiply it by the number of mL of water in your beaker, then divide it by 100 mL, (the amount of water the graph used as a basis.)
17. Add the salt slowly while your partner stirs it in.
18. Stir patiently, but if the salt does not dissolve completely, heat it to a slightly higher temperature, or add a few drops of water. It is vital that the solution be saturated.
19. Using a pencil and some thread, hang a seed crystal in the
solution, or just drop a crystal into your solution as a “seed”. The crystal
will grow around the seed crystal and enlarge it.
20. Let the solution cool and crystalize.
21. Remove your crystal and dry it for grading.
22. Categorize it using the picture to the right.
Writing up your report
Writing lab reports are a vital part of laboratory science, and a large part of you grade. The report must summarize what you hoped to accomplish, how you went about doing it, and the results you observed. Labs vary, but here are some suggestions:
1. Write your nameand the title of the lab at the top of the page.
2. Start with a description andpurpose of the lab.
3. List the materials you used and substitutions you made.
4. Write up the procedure you planned to follow.
5. Make a table out of the measurements you took and observations you made.
6. Record the formulas you used and the mathematics you did on the sheet.
7. List adaptations and changes you had to make as the lab progressed.
8. Write a conclusion, that is, what your results mean and answers to the questions posed by the purpose listed in #2.
9. List inherent problems with your approach, and sources of inaccuracy and error.
10. If possible, suggest an improved approach.
Every student is to submit a lab report. The report is not a group project.
Chemistry Lab
12 Ionic Salts 3: Electroplating With A Metal Ion Salt
|
Why Do Some Solids Dissolve in Water? Ionic salts dissolve in water because energy is given off when the polar salt molecules form intermolecular bonds with the polar water molecules. The weak bonds that form between the solute and the solvent compensate for the energy needed to disrupt the structure of both the pure solute (the salt) and the solvent (the water). In the case of CuSO4 and water, this process works enough to dissolve over 30 grams in a liter of water.
We can generally assume that salts dissociate into their ions when they dissolve in water.Ionic compounds dissolve in water if the energy given off when the ions interact with water molecules compensates for the energy needed to break the ionic bonds in the solid and the energy required to separate the water moleculesso that the ions can be inserted into solution.
When the salt is first added, it dissolves and dissociates rapidly. The conductivity of the solution therefore increases rapidly at first.
|
||||||||||||||||||||||||||||||||||||
|
Solubility: How solubility is measured The amount of solute that can be dissolved in a solvent is used as the measure of solubility. The conventional reference for solubility is the number of grams of solute that can dissolve in 100 mL of solvent. Sometimes the solubility is in grams of solute per 100 grams of solvent. The table below gives typical solubility data for some common inorganic compounds. |
These values are the amount of solute that will dissolve and form a saturated solution at the temperature listed. A saturated solution is one where there is an equilibrium between undissolved solute and dissolved solute.
NaCl(s) <---> Na1+(aq) + Cl1-(aq)
 The
solvent cannot dissolve more solute at that temperature.The
solubility can be increased if the temperature is increased.
The table shows that solubility usually increases with increasing temperature.
Clearly there are exceptions such as Ce2(SO4)3
The
solvent cannot dissolve more solute at that temperature.The
solubility can be increased if the temperature is increased.
The table shows that solubility usually increases with increasing temperature.
Clearly there are exceptions such as Ce2(SO4)3
Reading the Solubility Plot
 A
saturatedKCl solution at 10oC will have 31 grams of KCldissolved
in 100 grams of water. If there are 40 grams ofKCl
are in the container, then there will be 9 grams of undissolvedKClremaining
as a solid.
A
saturatedKCl solution at 10oC will have 31 grams of KCldissolved
in 100 grams of water. If there are 40 grams ofKCl
are in the container, then there will be 9 grams of undissolvedKClremaining
as a solid.
Raising the temperature of the mixture to 30oC will increase the amount of dissolvedKCl to 37 grams and there will be only 3 grams of solid undissolved. The entire 40 grams can be dissolved if the temperature is raised above 40oC. Cooling the hot 40oC solution will reverse the process.
Determining Concentration and Electrical Power
 First,
more salt may not make much difference. The conductivity of a solution does not rise evenly with its
concentration. Many substances produce ions that interfere with their own
ability to migrate with electrical currents because of interionic attractions.
Adding more salt can have little effect.
First,
more salt may not make much difference. The conductivity of a solution does not rise evenly with its
concentration. Many substances produce ions that interfere with their own
ability to migrate with electrical currents because of interionic attractions.
Adding more salt can have little effect.
Secondly, more conductivity will produce faster plating, but also not allow the copper time to adhere. Copper plating is sensitive to the level of the electric current amperage– that is the number of electrons,and its voltage– the amount force behind their movement. These values are in turn affected by resistance – the tendency to block electricity or turn it into heat. Which, in turn, is affected by the solution concentration. The math can be daunting. At this level, keep the electricity and concentrations low and you should do well.
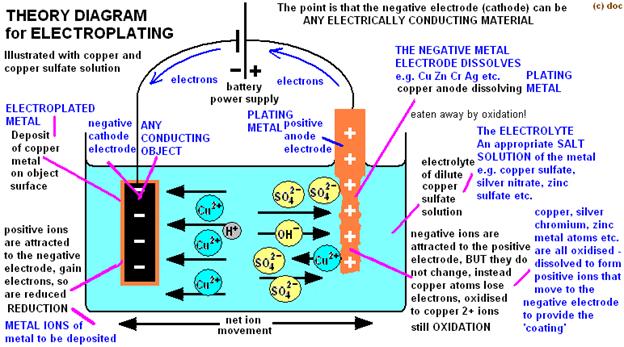
 3 Electroplating With A Metal Ion Salt
Electroplating is a form of electrolysis in which the electrodes play a bigger role than just conducting the current. Inelectrolysis, electricity is passed through an ionic substance to produce chemical reactions at the electrodes. Inelectroplating, the electrode itself goes into solution and solidifies again at the other electrode.Using electricity, you can coat the metal of one electrode with the metal of the other. Jewelry and silverware can be silver- or gold-plated, while zinc is often used to coat iron to protect against rust. Professional electroplatersuse specialized chemicals and equipment to ensure a high-quality coat.
Equipment:
 A low
voltage D.C.power supply. You can use a lab power supply, the peacock, ET
or a battery.
A low
voltage D.C.power supply. You can use a lab power supply, the peacock, ET
or a battery.- Two alligator clip leads or insulated wires
- A beaker or glass container
- 0.1M Copper sulfate solution
- Copper electrode (wire, pipe, or strip all work well)
- Object to coat (brass key, iron nail, washer, spring or something you own)
- Eye protection
Procedure:
- Choose a metal object to electroplate. Galvanized nails work poorly. They are coated already with zinc by electroplating or hot-dipping.
- Prepare the object for copper-plating by cleaning it with toothpaste, Cleanser, or soap and water. Dry it off on a paper towel. Try not to touch it with your hands. The oil and acids on your hands will affect the process.
- Pour some of your your 0.1 M copper sulfate solution into a beaker.
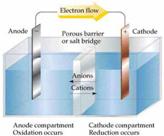
- Use one alligator clip to attach the copper electrode to the positive terminal (+) of the power source (this is now the anode)and the other to attach your object to the negative terminal (now called the cathode).The anodeabsorbs electrons, the cathodeprovides them.
- Partially suspend the object to be plated in the solution by wrapping the wire lead loosely around a pencil and placing the pencil across the mouth of the beaker. The alligator clip should not touch the solution.
- Place the piece of copper into the solution, making sure it doesn't touch the object you want to electroplate. Be sure the solution level is below the alligator clip. An electrical circuit has now formed and current is flowing.
- Leave the circuit running for 20-30 minutes, or until you are happy with the amount of copper on your object.
Make any innovations you wish to bring about a better result for more credit in this lab.
Theory:
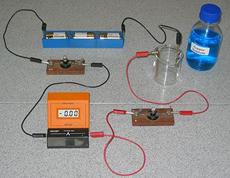
The copper sulfate solution is an electrolyte. Electrolytes are ionic compounds that dissolve and allow water to conduct electricity from one electrode to the other.Pure water is nonconductive. Small quantities of salts commonly found in tap water are what makes it a danger to people working with electricity. When the current is flowing, oxidation(loss of electrons) happens at the copper anode(+), adding copper ions to the solution. Those ions travel on the electric current to the cathode(-), where reduction (gain of electrons) happens, plating the copper ions onto the object you attached. There were already copper ions present in the copper sulfate solution before you started, but the oxidation reaction at the anode will keep replacing them in the solution as they are plated onto the cathode. That will keep the reaction going.
Writing up your report
Writing lab reports are a vital part of laboratory science, and a large part of you grade. The report must summarize what you hoped to accomplish, how you went about doing it, and the results you observed. Labs vary, but here are some suggestions:
11. Write your nameand the title of the lab at the top of the page.
12. Start with a description andpurpose of the lab.
13. List the materials you used and substitutions you made.
14. Write up the procedure you planned to follow.
15. Make a table out of the measurements you took and observations you made.
16. Record the formulas you used and the mathematics you did on the sheet.
17. List adaptations and changes you had to make as the lab progressed.
18. Write a conclusion, that is, what your results mean and answers to the questions posed by the purpose listed in #2.
19. List inherent problems with your approach, and sources of inaccuracy and error.
20. If possible, suggest an improved approach.
Every student is to submit a lab report. The report is not a group project.
Chemistry Lab
13 Building a Battery
Battery Theory[6]
Electricity is the flow of electrons through a conductive path like a wire. This path is called a circuit.
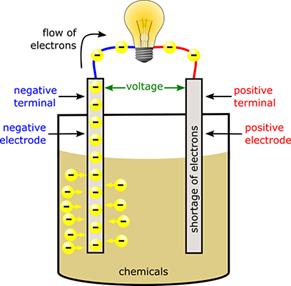 Batteries have three parts, an anode (-)[7], a cathode (+)[8], and the electrolyte[9]. The cathode and anode (the positive
and negative sides at either end of a traditional battery) are hooked up to an
electrical circuit.
Batteries have three parts, an anode (-)[7], a cathode (+)[8], and the electrolyte[9]. The cathode and anode (the positive
and negative sides at either end of a traditional battery) are hooked up to an
electrical circuit.
The chemical reactions in the battery causes a buildup of electrons at the anode. This results in an electrical difference between the anode and the cathode. You can think of this difference as an unstable build-up of the electrons. The electrons wants to rearrange themselves to get rid of this difference. But they do this in a certain way. Electrons repel each other and try to go to a place with fewer electrons.
In a battery, the only place to go is to the cathode. But, the electrolyte keeps the electrons from going straight from the anode to the cathode within the battery. When the circuit is closed (a wire connects the cathode and the anode) the electrons will be able to get to the cathode. In the picture above, the electrons go through the wire, lighting the light bulb along the way. This is one way of describing how electrical potential causes electrons to flow through the circuit.
However, these electrochemical processes change the chemicals in anode and cathode to make them stop supplying electrons. So there is a limited amount of power available in a battery.
When you recharge a battery, you change the direction of the flow of electrons using another power source, such as solar panels. The electrochemical processes happen in reverse, and the anode and cathode are restored to their original state and can again provide full power.
 Anode and Cathode Ideas
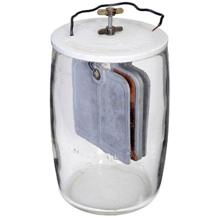
Batteries work because the anode and cathode have a different electronegativity. There is a picture of Tomas Edison’s Nickle Iron battery (NiFe). It has Nickle oxide hydroxide NiO(OH) as a positive plate and iron as a negative plate. It produced 1.4 volts and was known for its durability often lasting for more than 20 years.
You
are likely going to use two metals for the sake of simplicity. The table to
the left was provided 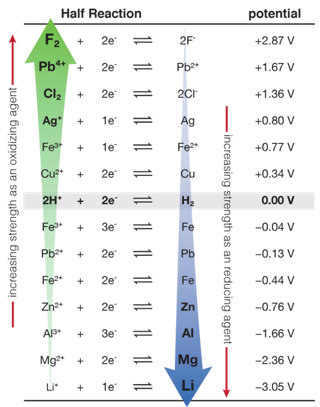 by the University of
Texas to help their students decide which metals to use in their battery
projects. Recall that two reactions are occurring at the same time. A
reduction reaction takes place at the anode. Electrons are taken from metal
ions and the metal deposits on the anode itself. The second reaction is an
oxidation reaction at the cathode. Metal atoms are ionized and go into
solution. Figure out the maximum voltage by subtracting the reduction
potential from the oxidation potential.
by the University of
Texas to help their students decide which metals to use in their battery
projects. Recall that two reactions are occurring at the same time. A
reduction reaction takes place at the anode. Electrons are taken from metal
ions and the metal deposits on the anode itself. The second reaction is an
oxidation reaction at the cathode. Metal atoms are ionized and go into
solution. Figure out the maximum voltage by subtracting the reduction
potential from the oxidation potential.
![]()
 Some home schoolers make a coke can battery constructed from a
piece of thick copper grounding wire, a strip of aluminum from a soda can, and
a glass of Coke. The aluminum was cut with a pair of tin snips and then sanded
to remove the paint. [10]
Some home schoolers make a coke can battery constructed from a
piece of thick copper grounding wire, a strip of aluminum from a soda can, and
a glass of Coke. The aluminum was cut with a pair of tin snips and then sanded
to remove the paint. [10]
This is an idea from a school like ours: To make a bleach battery, fill a beakers a third of the way with water. Add ¼ that amount of bleach. Fold one strip of copper and one strip of aluminum over the side of each cup with as much of the metal in the solution as possible.[11]
One of the first batteries, invented by Alessandro Volta, is the voltaic pile. It is a stack of alternating zinc and copper sheets separated by paper soaked in salt water or vinegar, creating a series of thin battery cells.[12]
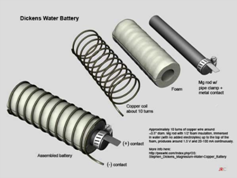
 The Dickens battery uses the magnesium as its source of
electricity, which many you probably already know if you’ve ever used a fire
starter, is a very energy dense material. The design is simple enough that
pretty much anyone can make it.
The Dickens battery uses the magnesium as its source of
electricity, which many you probably already know if you’ve ever used a fire
starter, is a very energy dense material. The design is simple enough that
pretty much anyone can make it.
You start out with thick, magnesium rods, which you can buy on Ebay. After that, you’ll need to fasten a metal electrode to the rod with a hose clamp. The metal used for this step is never specified, so feel free to try out a few different metals to see what nets you the best results (more on that in a moment).
After that, you wrap the rod in porous foam, and then coil copper wire around the foam. The idea is to allow water to pass through the foam, but to keep the copper from touching the electrode. Doing so won’t cause anything catastrophic, but your battery will stop producing energy.
After it’s all said and done, it should look like this:
From there, you’ll need a small jar to store this contraption, and you’ll have to puncture holes in the lid to allow the positive and negative contacts to push through. Fill the jar with tap water up to the top of the foam, and close the lid with the contacts exposed. You’ll also need to use something like caulk to seal the holes in the lid, thus keeping the water from evaporating. And that’s it! Your magnesium battery is all done.[13]
If you need more voltage, make a Daniell’s cell, invented by John Fredric Daniell. A Daniell’s cell is made up of a copper strip in a copper sulfate solution and a zinc strip in a zinc sulfate solution. A salt bridge connects the two electrolyte solutions.[14]
See the last page of this lab for a better table of anions and cations.
Making the electrolyte for your battery[15]
Fill a beaker half full of water. For an electrolyte solution, distilled water is the best choice. It will minimize the possible contaminants in the solution. Some contaminants could cause a reaction with the electrolyte ions. For example, if you are mixing a solution of NaCl and the water contains low levels of lead, you will get a precipitate coming out of solution. The removal of some of the ions from solution changes the strength of the solution.
Choose an electrolyte that supports the application best. For batteries, you should select an electrolyte that includes an element used in one or both of the half-cells. For example, if one of the half-cell reactions is with copper, a good choice of an electrolyte is CuCO3 or CuCl2. Both of these will support the half-cell by ensuring that there are Cu2+ ions in solution. You should choose a strong acid, a strong base or the salt of one of these. The high dissociation value of these compounds enhances the ability of the electrolyte solution to transport charge.
 Measure enough strong acid, strong base
or salt to generate an electrolyte solution of sufficient strength to support
the demands of the electrochemical cell. If the concentration of the
electrolyte is too low, it can inhibit the operation of the electrochemical
cell. The electrolyte
concentration should be in the range of 1M. Strong acid, bases and salts therefore work better than
weak acid and bases due to the higher degree of dissociation.
Measure enough strong acid, strong base
or salt to generate an electrolyte solution of sufficient strength to support
the demands of the electrochemical cell. If the concentration of the
electrolyte is too low, it can inhibit the operation of the electrochemical
cell. The electrolyte
concentration should be in the range of 1M. Strong acid, bases and salts therefore work better than
weak acid and bases due to the higher degree of dissociation.
Making Molar Solutions[16]
 Molar (M) solutions are based on the
number of moles of chemical in 1 liter of solution. A mole consists of
6.02×10²³ molecules or atoms. Molecular weight (MW) is the weight of one mole
of a chemical. Determine
MW using a periodic table by adding the atomic mass of each atom in the
chemical formula.
Example: For the MW of CaCl2, add the atomic mass of Ca (40.01) to that of two
Cl (2 x 35.45) to get 110.91 g/mole. Therefore, a 1M solution of CaCl2 consists
of 110.91 g of CaCl2 dissolved in enough water to make one liter of solution.
Molar (M) solutions are based on the
number of moles of chemical in 1 liter of solution. A mole consists of
6.02×10²³ molecules or atoms. Molecular weight (MW) is the weight of one mole
of a chemical. Determine
MW using a periodic table by adding the atomic mass of each atom in the
chemical formula.
Example: For the MW of CaCl2, add the atomic mass of Ca (40.01) to that of two
Cl (2 x 35.45) to get 110.91 g/mole. Therefore, a 1M solution of CaCl2 consists
of 110.91 g of CaCl2 dissolved in enough water to make one liter of solution.
Once the molecular weight of a chemical is known, the weight of chemical to dissolve in a solution for a molar solution less than 1M is calculated by the formula:
grams of chemical = (molarity of solution in mole/liter) x (MW of chemical in g/mole) x (ml of solution) ÷ 1000 ml/liter
For example, to make 100 ml of 0.1 M CaCl2 solution, use the previous formula to find out how much CaCl2 you need:
grams of CaCl2 = (0.1) x (110.91) x (100) ÷ (1000) = 1.11 g
Now you can make your solution: dissolve 1.11 g of CaCl2 in sufficient water to make 100 ml of solution. The amount of water needed will be slightly less than 100 ml.
 A balance and a volumetric flask are used to make molar solutions. A
procedure for making a molar solution with a 100 ml volumetric flask is as
follows:
A balance and a volumetric flask are used to make molar solutions. A
procedure for making a molar solution with a 100 ml volumetric flask is as
follows:
Calculate the weight of chemical needed to make 100ml of solution using the above formula.
Weigh out amount of chemical needed using a balance.
 Transfer the weighed out chemical to a
clean, dry 100ml volumetric flask.
Transfer the weighed out chemical to a
clean, dry 100ml volumetric flask.
Fill to
line![]()
Slowly add distilled water
to the volumetric flask. Wash all the chemical into the bottom of the flask as
you do so. Keep adding water until you reach the 100ml mark on the neck of the
flask.
Place the stopper in the flask and gently swirl the flask until all the chemical is dissolved.

![]() If you don’t have a
volumetric flask you can use a 100ml graduated cylinder instead. Just add the
chemical to the graduated cylinder and then add distilled water until you reach
the 100ml mark in the side of the cylinder.
If you don’t have a
volumetric flask you can use a 100ml graduated cylinder instead. Just add the
chemical to the graduated cylinder and then add distilled water until you reach
the 100ml mark in the side of the cylinder.
Building your battery


 You are going to need
to combine the anode, cathode and electrolyte in a container like a beaker. Here
are some pictures what other folks did:
You are going to need
to combine the anode, cathode and electrolyte in a container like a beaker. Here
are some pictures what other folks did:
 Salt Bridges[17]
Salt bridges maintains electrical neutrality within the internal circuit, preventing the cell from rapidly running its reaction to equilibrium. If no salt bridge were present, the solution in one half cell would accumulate negative charge and the solution in the other half cell would accumulate positive charge as the reaction proceeded, quickly preventing further reaction, and hence production of electricity.
Glass tube bridges[18]
One type of salt bridge consists of a U-shaped glass tube filled with a relatively inert electrolyte; usually potassium chloride or sodium chloride is used, although the diagram here illustrates the use of a potassium nitrate solution. The electrolyte is so chosen thatit does not react with any of the chemicals used in the cellthe anion and cation have similar conductivity, and hence similar migratory speed.
The electrolyte is often gelified with agar-agar to help prevent the intermixing of fluids which might otherwise occur.The conductivity of a glass tube bridge depends mostly on the concentration of the electrolyte solution. At concentrations below saturation, an increase in concentration increases conductivity. Beyond-saturation electrolyte content and narrow tube diameter may both lower conductivity.
Filter paper bridges[19]
The other type of salt bridge consists of a filter paper, also soaked with a relatively inert electrolyte, usually potassium chloride or sodium chloride because they are chemically inert. No gelification agent is required as the filter paper provides a solid medium for conduction.
Conductivity of this kind of salt bridge depends on a number of factors: the concentration of the electrolyte solution, the texture of the filter paper and the absorbing ability of the filter paper. Generally, smoother texture and higher absorbency equates to higher conductivity.
A porous disk or other porous barrier between the two half-cells may be used instead of a salt bridge; however, they basically serve the same purpose.
Calculating Voltage
Electrode
Potential, written E0, is the cell voltage. It varies with
concentration, surface area, temperature, pressure, lighting, and many other
factors, but a mathematically perfect calculation is possible, if the chemistry
of both the anode (-) and the cathode (+) are known. Here is the equation: ![]()